
Top 5 Red-Light Techniques for Capturing Nocturnal Animals
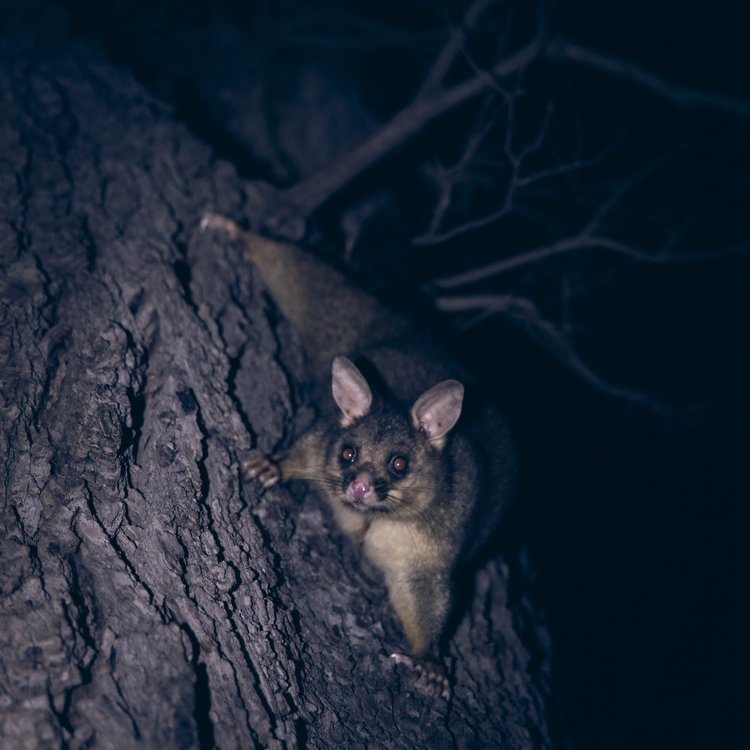
Nocturnal wildlife photography offers one of the most exhilarating challenges for outdoor photographers. There’s something mystical about photographing animals that thrive under moonlight—whether it’s the silent swoop of an owl or the alert gaze of a marsupial frozen in the shadows. But it also requires a delicate approach. Disturbing nocturnal animals with harsh lighting can alter their natural behaviors, cause stress, or even scare them away entirely.
That’s why using red light in wildlife photography has gained popularity among responsible photographers and conservation advocates. In this guide, we’ll explore red light wildlife photography tips, recommended gear, and the top techniques for capturing breathtaking nocturnal images while respecting the natural world.
Why Use Red Light in Wildlife Photography?
Before diving into techniques, let’s understand why red light is crucial in nocturnal settings.
Nocturnal animals have highly sensitive eyes adapted to low light. White light, even at low intensities, can trigger flight responses or disorient them. Red light, on the other hand, falls on the long-wavelength end of the spectrum and is less likely to be detected by many species.
The science behind it:
Reduced sensitivity: Most nocturnal animals don’t perceive red wavelengths well, making it a non-intrusive light source.
Minimal disruption: It helps preserve natural behavior patterns, critical for both ethical photography and ecological balance.
Night vision-friendly: Red light preserves your own dark adaptation, allowing better peripheral vision and camera control in the dark.
Using red light correctly is not just about the gear—it’s about understanding behavior, habitat, and respecting boundaries. Let’s dive into the top 5 techniques.
1. Use Low-Intensity, Focused Beams to Stay Undetected
The first rule of nocturnal photography is to be invisible. Red light helps, but only when it's used with precision.
Pro Tips:
Use LED torches with adjustable intensity and beam angle. Avoid models with wide or unfocused beams.
Look for brands like Ledlenser, Fenix, or Olight, which offer wildlife-friendly red modes.
Set your beam to low or medium intensity and direct it to the ground first, then tilt upward slowly.
Tape or modify your torch with diffusion gels to soften harshness.
This approach helps you photograph wildlife without altering their behavior or startling them mid-hunt or mid-flight.
2. Position Lights Strategically to Minimize Eye-Glare and Shadow
Even red light can be disruptive if pointed directly into an animal’s eyes. Where you position your light matters.
Technique Breakdown:
Avoid front-facing angles. Instead, position the light source slightly off to the side or above the camera.
Use light diffusers or homemade filters to reduce hard shadowing and create a more natural appearance.
For perched birds or mammals, bounce the red light off a surface like a nearby tree or ground to achieve ambient glow.
This not only minimizes disturbance but also enhances the mood and realism of your photos.
3. Integrate Red Light with Infrared Motion Sensors
For elusive nocturnal species, combining red light with infrared tech can be a game-changer.
Passive Techniques:
Use motion-triggered trail cameras equipped with red glow infrared LEDs.
Supplement with a faint red glow that activates only when motion is detected.
Perfect for photographing possums, owls, or nocturnal reptiles in their natural state.
This setup allows you to be completely hands-off, capturing authentic moments while staying hidden. It also supports conservation by minimizing disturbance to wildlife and preserving nocturnal routines.
4. Balance Ambient Light with Red Light to Preserve Natural Scenes
The goal of wildlife photography isn’t to spotlight—it’s to tell stories with light and shadow. Sometimes, the best photos come from blending ambient starlight, moonlight, and red light in subtle harmony.
Camera Settings:
Use slow shutter speeds (1/4 to 1/30 sec) with a tripod to gather ambient light.
ISO 3200–6400 works well for low-light wildlife captures with minimal red light fill.
Open your aperture wide (f/2.8 or lower) to let in more light.
Capture the feeling of the night—let shadows dominate, let silhouettes form, and let red light play only a supporting role.
5. Pair Red Light with Night Vision Aids (Ethically)
Sometimes red light alone isn’t enough—especially in pitch-dark forests or during overcast nights. Pairing it with night vision aids can elevate your results.
How to Use:
Use thermal scopes or NV goggles to locate animals silently.
Once spotted, use a soft red light for photography, not to observe or stalk.
Avoid white-light “safety overrides” unless absolutely necessary.
Remember: Ethics first. Never pursue or blind animals for a shot.
Common Mistakes to Avoid in Red Light Wildlife Photography
Even experienced photographers can slip up in low light. Avoid these common pitfalls:
Direct red beam into animal eyes – can still cause distress.
Using lights that are too bright or white-balanced wrong – ruins natural ambiance.
Flashing multiple lights or strobes – disrupts entire ecosystems.
Staying too long in one location – overstays your welcome in sensitive habitats.
Tony Corry’s Field Notes: Real Lessons from the Dark
As a wildlife and adventure photographer based in Australia, I’ve had countless encounters with creatures of the night. From photographing gliding sugar gliders under red light to capturing owls in flight, my field setup always prioritizes:
Low-profile lighting gear
Pre-scouted locations with minimal habitat disruption
Silent operation mode on all cameras
Red light has not only improved my photography—it has deepened my connection with the wild.
Conclusion: Capture the Night, Don’t Conquer It
Nocturnal wildlife photography is about humility, patience, and precision. Red light, when used properly, allows us to step into another world—one that’s full of whispers, rustles, and reflections. Respect it, and it will reward you with images that are both technically beautiful and ethically responsible.
Whether you're just getting started or fine-tuning your gear, these red light wildlife photography tips will help you work with—not against—nature.
FAQs
Is red light safe for nocturnal animals?
Yes, it’s less disturbing since many can’t detect red wavelengths well.Can I use any red LED torch?
No—choose low-intensity, adjustable, focusable red LEDs without harsh or flashing light.Difference between red and infrared light?
Red light is visible to humans but less so to animals; infrared is invisible and used in night vision and sensors.How to photograph moving animals with red light?
Use high ISO, wide aperture, faster shutter, pre-focus, and anticipate movement.Does red light affect night vision?
No, it helps preserve night vision by not constricting pupils.Any legal restrictions on night lighting?
Yes, especially in protected areas. Always check rules—some restrict red light during sensitive seasons.